Note: some of this code is old; it could be rewritten to benefit more from SQL’s windowing and other advanced functions.
I’ve been poking around some old code of mine recently – since it’s going unused, maybe someone on the Internet would benefit from it. A few years ago, I was toying with some code to detect Twitter trending tweets. Consider a SQL table set up like the below, where user is the name of Twitter user posting the tweet, ID is the tweet ID, created_at is the creation date of the tweet, and retweet_count/favorite_count are the number of retweets and favorites the tweet had.
CREATE TABLE twitter (
    category VARCHAR(30),
    user VARCHAR(30),
    id VARCHAR(90),
    created_at DATETIME,
    retweet_count INT,
    favorite_count INT,
    add_date DATETIME
);
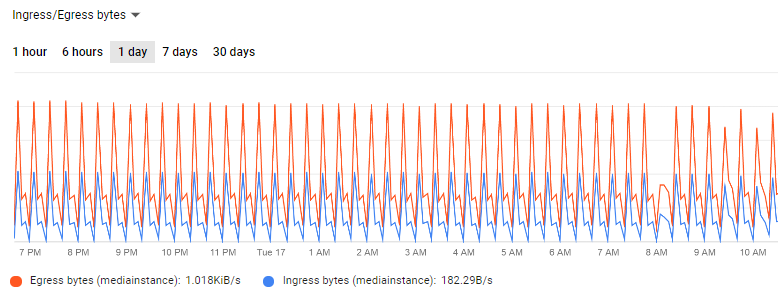
The trend finder worked like this: it would take snapshots of each Tweet’s retweet and favorite count (add_date is the datetime of the snapshot) and then compare the snapshots to detect how fast the tweet was gaining retweets/favorites. The comparison was done in SQL. I named the gain rate of retweets/favorites the slope of the activity, and calculated multiple slopes: the increase in retweets/favorites within the most recent 90 minutes, and the overall increase of retweets/favorites. Here’s the simplified SQL (other SQL has been cut off because this is already too long, and not relevant to the point I’m making):
insert into tweet_slope
(

select twitter.created_at, twitter.category, twitter.id, twitter.retweet_count as max_retweet,
 twitter.favorite_count as max_favorite, twitter.add_date, new_table.max_date,
 first_table.first_date, first_table.first_retweet, first_table.first_favorite,
 prior_table.prior_date, prior_table.prior_retweet, prior_table.prior_favorite,

(twitter.retweet_count - first_table.first_retweet) as full_retweet_diff,
TIMESTAMPDIFF(MINUTE, first_table.first_date, new_table.max_date) as full_retweet_timespan,
((twitter.retweet_count - first_table.first_retweet) /
TIMESTAMPDIFF(MINUTE, first_table.first_date, new_table.max_date)) as full_retweet_slope,
(twitter.retweet_count - prior_table.prior_retweet) as recent_retweet_diff,
TIMESTAMPDIFF(MINUTE, prior_table.prior_date, new_table.max_date) as recent_retweet_timespan,
((twitter.retweet_count - prior_table.prior_retweet) /
TIMESTAMPDIFF(MINUTE, prior_table.prior_date, new_table.max_date)) as recent_retweet_slope,
(twitter.favorite_count - first_table.first_favorite) as full_favorite_diff,
TIMESTAMPDIFF(MINUTE, first_table.first_date, new_table.max_date) as full_favorite_timespan,
((twitter.favorite_count - first_table.first_favorite) /
TIMESTAMPDIFF(MINUTE, first_table.first_date, new_table.max_date)) as full_favorite_slope,
(twitter.favorite_count - prior_table.prior_favorite) as recent_favorite_diff,
TIMESTAMPDIFF(MINUTE, prior_table.prior_date, new_table.max_date) as recent_favorite_timespan,
((twitter.favorite_count - prior_table.prior_favorite) /
TIMESTAMPDIFF(MINUTE, prior_table.prior_date, new_table.max_date)) as recent_favorite_slope
 from (select id, max(add_date) as max_date from twitter group by id) as new_table
 inner join twitter on twitter.id=new_table.id and twitter.add_date=new_table.max_date
 INNER JOIN
(select twitter.id, twitter.add_date as first_date, twitter.retweet_count as
 first_retweet, twitter.favorite_count as first_favorite from twitter inner
 join (select id, min(add_date) as min_date from twitter group by id) as old_dates
 on twitter.id=old_dates.id and twitter.add_date=old_dates.min_date) as first_table

 on twitter.id=first_table.id
 INNER JOIN
 (select twitter.id, twitter.add_date as prior_date, twitter.retweet_count as
 prior_retweet, twitter.favorite_count as prior_favorite from twitter INNER JOIN
 (select id, max(add_date) as prior_set_date from twitter where add_date <
 DATE_SUB(NOW(), INTERVAL 90 MINUTE) group by id) as prior_set
 ON twitter.add_date=prior_set.prior_set_date and twitter.id=prior_set.id) as  prior_table
 ON twitter.id=prior_table.id
 where twitter.created_at > DATE_SUB(NOW(), INTERVAL 1 DAY) AND
 new_table.max_date > DATE_SUB(NOW(), INTERVAL 45 MINUTE) AND
 new_table.max_date <> first_table.first_date
and twitter.category = :category
)
;
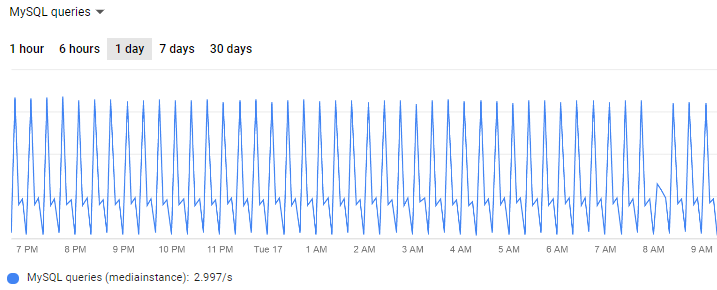
Now this code worked, and it worked great! A fast DB machine made all the difference to crunch out all the SQL calculations. I tested it by sampling tweets from sets of related accounts. One set I tested were all Disney/Marvel/Star Wars-related Twitter accounts (for instance, the accounts of actors for Luke Skywalker, Iron Man, Disney Parks) and the top-ranking tweets were almost all from Mark Hamill’s account; on the day I was testing, Mark’s tweets had thousands of favorites/retweets due to being politics-related.
I said this code was old at the beginning of the post, and that’s true – it has since been replaced. While this code worked, it was too simple: in practice, it would never surface some trending tweets from less-popular Twitter accounts.
The real problem is that the popularity of tweets is a bimodal distribution: most tweets end up puttering along with, at best, a handful of retweets/favorites; some might even get a few hundred. But then there’s a small minority of tweets, posted from extremely popular accounts, that get thousands and thousands of favorites and retweets regardless of the individual tweet’s merit – the tweets themselves are popular because the poster is popular. This crowds out the trending tweets from the other section of the bimodal graph.
I rebuilt the application to take into account the number of followers a Twitter user has (as a proxy for the account’s relative popularity) and to compare a tweet to the account’s tweet history (how popular is a given tweet compared to the other tweets in the same account?). I’ll share the code soon.