Using Google Protobuf Timestamp In PHP

This is more of a documentary post because I haven’t seen documentation on Google’s Timestamp class anywhere.

Google’s libraries – in particular, the GCP libraries for datastore/tasks/etc – use the Google/Protobuf/Timestamp class to represent time. Timestamp is a simple wrapper around the number of seconds since UNIX epoch, in the UTC timezone. For example here is how to create a Timestamp reflecting the current date and time, plus 2 minutes into the future (120 seconds):

use Google\Protobuf\Timestamp;

    $future_time_seconds = time() + 120;
    $future_timestamp = new Timestamp();
    $future_timestamp->setSeconds($future_time_seconds);
    $future_timestamp->setNanos(0);

There are equivalent classes and functions for Python/Java/Go/other languages that Google Cloud supports.

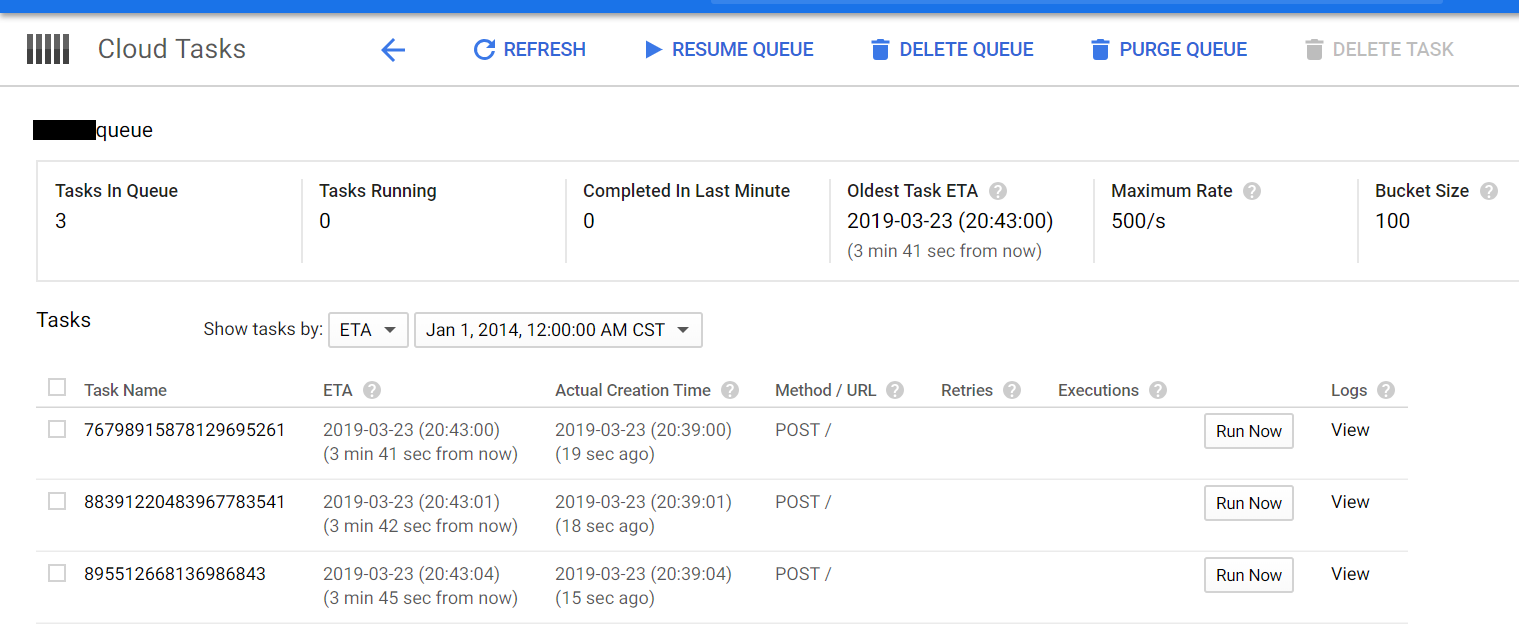
Using the Timestamp class – especially setting up future dates – is necessary for configuring my favorite Google Cloud service: Cloud Tasks. A Cloud Task can accept a future date to run at, thereby giving you a way to queue up and delay execution of an activity. For example, see the below screenshot: I’ve created 3 tasks 20 seconds ago, yet they’re set for a future execution 3 minutes 45 seconds from now:

Querying For Previous Published WordPress Posts

The following code example pulls out the last 5 published WordPress posts by their ID, extracts the first ID (which is the last published post ID) and then extracts the post’s tags into an array.

$return_tag_array is a list of the last published post’s tags.

  //Get list of past published posts, up to 5
  $args = array(
	'numberposts' => 5,
	'offset' => 0,
	'category' => 0,
	'orderby' => 'post_date',
	'order' => 'DESC',
	'include' => '',
	'exclude' => '',
	'meta_key' => '',
	'meta_value' =>'',
	'post_type' => 'post',
	'post_status' => 'publish',
	'suppress_filters' => true
);
	
  $published_posts = wp_get_recent_posts( $args, ARRAY_A );

  //Pull off the top most post, & retrieve the ID
  $last_published_post = reset($published_posts);
  $last_published_post_id = $last_published_post["ID"];

  //TAGS	
  //Use the post ID to pull off tags
  $tags = wp_get_post_tags($last_published_post_id);
  $return_tag_array = array();	
  foreach ($tags as $tag) {
	  $tag_name = $tag->name;
	  array_push($return_tag_array, $tag_name);
  }

Adding Categories To A WordPress Post

I’ve been writing a custom WordPress plugin to accept emailed posts and insert them into a WordPress blog. One of the difficult issues I’ve encountered is that WordPress deals with tags and categories in different ways: it’s relatively easy to add and remove tags. It takes a bit of roundabout work to do the same with categories.

The below code fragment takes a string array of categories ( $to_post_categories ) and sets them onto a post (the ID of the post is in $created_post_id ).

	//Set post categories
	/**
	 * WP doesn't allow us to set categories as easily as tags. With tags we can simply declare 
	 * the names of the tags and be done with it. WP requires that we pass in the ID of the category, 
	 * and if the category doesn't exist, we need to create it. So we loop through the array of 
	 * category names, see if they exist (and if so, collect the ID) and if they don't exist, 
	 * create the category and map the ID to the post.
	 **/
	 foreach ($to_post_categories as $category_name) {
		 $category_id = get_category_by_slug($category_name);
		 if ($category_id == false) {
			 //Category doesn't exist, create it
			 $category_id = wp_create_category($category_name);
		 }
		 
		 //category_id now holds ID of right category or recently created category.
		 //Add category to post
		 wp_set_post_categories($created_post_id, array($category_id), true);
	 }//end looping through post categories sent to us

PHP Post To PubSub

Today is a rather large fragment demonstrating how to post to Google PubSub. While there are libraries to handle this, I prefer to understand the low-level process so debugging is easier.

Note that this fragment is designed to run on App Engine, as it relies on the App Identity service to pull the credentials required to publish to PubSub. You only need to set up 3 variables: $message_data, which should be a JSON-encodable object, NAMEOFGOOGLEPROJECT, which is the name of the Google project containing the pubsub funnel you want to publish to, and NAMEOFPUBSUB which is the pubsub funnel name.

It isn’t required, but it is good practice to customize the User-Agent header below. I have it set to Publisher, but a production service should have it set to an appropriate custom name.

use google\appengine\api\app_identity\AppIdentityService;

//Build JSON object to post to Pubsub

$message_data_string = base64_encode(json_encode($message_data));

$single_message_attributes = array ("key" => "iana.org/language_tag",
    "value" => "en",
);

$single_message = array ("attributes" => $single_message_attributes,
    "data" => $message_data_string,
);
$messages = array ("messages" => $single_message);

//Post to Pubsub

$url = 'https://pubsub.googleapis.com/v1/projects/NAMEOFGOOGLEPROJECT/topics/NAMEOFPUBSUB:publish';

$pubsub_data = json_encode($messages);

syslog(LOG_INFO, "Pubsub Message: " . $pubsub_data);

$access_token = AppIdentityService::getAccessToken('https://www.googleapis.com/auth/pubsub');

$headers = "accept: */*\r\n" .
    "Content-Type: text/json\r\n" .
    "User-Agent: Publisher\r\n" .
    "Authorization: OAuth " . $access_token['access_token'] . "\r\n" .
    "Custom-Header-Two: custom-value-2\r\n";

$context = [
    'http' => [
        'method' => 'POST',
        'header' => $headers,
        'content' => $pubsub_data,
    ]
];
$context = stream_context_create($context);
$result = file_get_contents($url, false, $context);

syslog(LOG_INFO, "Returning from PubSub: " . $result);

Whitelisted PHP Extensions

Google App Engine permits only specific whitelisted extensions to be used within PHP applications. If you use a non-whitelisted extension, you’ll see the below error:

The [php_extension_name] extension is missing. 
Please check your PHP configuration.

If you need a certain extension for your PHP application, ensure that it’s enabled in GAE: check the official list at https://developers.google.com/appengine/docs/php/#PHP_Enabled_extensions . If your preferred extension is not listed, you can also try searching for a pure-PHP implementation (Pure PHP extensions can always be uploaded as part of an application; C based extensions must be whitelisted.)

If you need an extension not listed in the above link, you can request it via the App Engine issues tracker. For example, here’s a feature request for the ImageMagick extension: https://code.google.com/p/googleappengine/issues/detail?id=9424

Accessing Google Cloud SQL From App Engine

Accessing Google Cloud SQL from an App Engine application is relatively straightforward. To start, an application must first specify a host name for the Cloud SQL servers.

For example, here’s the host name for PHP applications:

:/cloudsql/[Google-Cloud-Project-Name]:[Cloud-SQL-Instance-Name]

Java accesses Cloud SQL through a special JDBC driver. Here’s the proper host name for it:

jdbc:google:mysql://[Google-Cloud-SQL-Project-Name]:[Cloud-SQL-Instance-Name]/[Database-Name]

Secondly, Cloud SQL must whitelist incoming connections from permitted App Engine applications. To do this, open up the Google Cloud console and select the project you’re using. Then press the Cloud SQL option on the left hand navigation bar:

Click the New Instance button:

On the bottom of the form there’s an option to whitelist named App Engine applications. Type in the application ID of the App Engine application using the database:

Click the Confirm button to finish setting up the database.

Transitioning To 1.8.8

A few days ago, App Engine finished transitioning to the 1.8.8 runtime. Here’s a screenshot of an application in the middle of the transition (note that one instance is running 1.8.7, while the other is running 1.8.8):

My favorite part of this patch is the new ability to edit PHP strings in memcache:

Logging In PHP

A quick note: here’s how to write a line of text into logging on the PHP runtime:

syslog(LOG_INFO, "Log Text: " . $variable_to_log);

The first argument can be replaced with standard PHP logging levels, such as LOG_WARNING.

A reminder: App Engine ignores calls to openlog() and closelog() . While you can still call these functions (for instance if you have legacy code), they will not affect logging.

Retrieving The User’s IP Address

Retrieving the originating IP address of the request is simple in most languages.

Here’s how to retrieve the IP address in Java ( req represents a javax.servlet.http.HttpServletRequestreference ):

String ip = req.getRemoteAddr();

Here’s the same line in Go ( r represents http.Request ):

ip := r.RemoteAddr

In PHP, the originating IP can be retrieved from the predefined variable SERVER :

$_SERVER['REMOTE_ADDR']

Error Parsing YAML File: While Scanning A Simple Key

App Engine uses the app.yaml file to route incoming requests to the appropriate handlers. It’s important to write proper YAML code in this file, otherwise your application may behave erratically or not at all.

One common problem with YAML files is failing to properly separate key:value pairs. The YAML specification requires a colon ( : ) and one space character between the key and the associated value. Here’s an example of a properly formatted YAML key:value pair:

Key: Value

Now here’s an example of a broken app.yaml file:

application: an-example-application-id
version: 1
runtime: php
api_version: 1
threadsafe:true

Notice the error? The threadsafe property has a colon, but no space separating the key ( threadsafe) and the value ( true ). Here’s a screenshot of appcfg refusing to upload this broken file:

If you receive this error, make sure that all of your YAML properties are separated by a colon and a space. One space is enough, don’t use tabs or multiple spaces.