Facebook Outbound Email

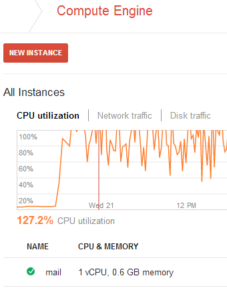
I’m in the middle of testing an email server on Compute Engine, and I noticed something unusual: apparently Facebook’s outbound email servers insist on using extended SMTP to send email.

With extended SMTP, an email server sends email by opening up a connection and sending the EHLO command. The proper response is either 250 (to indicate success and that extended SMTP support is available) or 550 (the responding server did not understand the command, which is another way of saying that the responding server does not support ESMTP). In case of 550 errors, the usual practice is to fall back to the original SMTP command set and to send a HELO request.

But Facebook’s outbound mail servers seem to only want to connect with ESMTP servers: FB mail servers send a quit command instead of falling back to sending a HELO command.

Another interesting oddity from watching mail logs: Google’s Gmail servers seem to be the only mail servers properly implementing the BDAT command (binary data). I never see any other mail servers attempt to use it.

Removing EXIF Data With ImageMagick

Recently I needed to find a way to mass-remove EXIF data from multiple images. EXIF – if you didn’t know – is essentially metadata included within images. This metadata can include the name of the camera, the GPS coordinates where the picture was taken, comments, etc.

The easiest way is to remove EXIF data is to download ImageMagick and use the mogrify command line tool:

mogrify -strip /example/directory/*

ImageMagick can be run within a Compute Engine VM to make it available to a web application. Here’s the command to install ImageMagick:

sudo aptitude install imagemagick

Communicating With Sockets On Compute Engine

Writing custom applications on Compute Engine requires the use of sockets to communicate with clients. Here’s a code example demonstrating how to read and write to sockets in Java.

Assume that client_socket is the socket communicating with the client:

/**
 * Contains the socket we're communicating with.
 */
Socket client_socket;

Create a socket by using a ServerSocket (represented by server_socket ) to listen to and accept incoming connections:

Socket client_socket = server_socket.accept();

Then extract a PrintWriter and a BufferedReader from the socket. The PrintWriter out object sends data to the client, while the BufferedReader in object lets the application read in data sent by the client:

/**
 * Handles sending communications to the client.
 */
PrintWriter out;
/**
 * Handles receiving communications from the client.
 */
BufferedReader in;
try {
    //We can send information to the client by writing to out.
    out = new PrintWriter(client_socket.getOutputStream(), true);
    //We receive information from the client by reading in.
    in = new BufferedReader(new InputStreamReader(client_socket.getInputStream()));
    /**
     * Start talking to the other server.
     */
    //Read in data sent to us.
    String in_line = in.readLine();
    //Send back information to the client.
    out.println(send_info);
}//end try
catch (IOException e) {
    //A general problem was encountered while handling client communications.
}

A line of text sent by the client can be read in by calling in.readLine() demonstrated by the in_line string. To send a line of text to the client, call out.println(send_info) where send_info represents a string. If an error occurs during communication, an IOException will be thrown and caught by the above catchstatement.

Remember to add the following imports:

import java.io.IOException;
import java.net.ServerSocket;
import java.net.Socket;
import java.io.InputStreamReader;
import java.io.PrintWriter;
import java.io.BufferedReader;

Releasing A Static IP In Compute Engine

Compute Engine allows static IPs to be reserved, even if no VM is attached. However, IPs that are unattached to VMs or load balancers are charged at $0.01 per hour. To avoid this charge, it’s a good idea to release IPs that are no longer in use.

To release a static IP, first go to the Compute Engine section of the Google Cloud Console. Select the Networks option:

A list of the IPs allocated to the project will be displayed:

Select the IP to remove and click the link labeled Release IP address:

You’ll see a confirmation box next. Press Yes.

The console will need a few moments to release the IP:

Creating A Server In Java On Compute Engine

Compute Engine is a terrific hosting platform for applications – not only HTTP-based applications, but for servers running all types of services. To run these services an application has to listen for incoming connections using a server socket. Here’s how to do that in Java.

First, bind a server socket to a port. Here we’re binding it to the SMTP-reserved port 25. The port binding will fail if there’s already a server bound to that port.

//The server socket that handles all incoming connections.
ServerSocket server_socket = null;
//Bind the server socket to port 25. Fail and exit 
//if we fail to bind.
try {
    server_socket = new ServerSocket(25);
    System.out.println("OK: Bound to port 25.");
} 
catch (IOException e) {
    System.err.println("ERROR: Unable to bind to port 25.");
    e.printStackTrace();
    System.exit(-1);
}

Now wait for an incoming connection to accept (you can put the following code into a while loop if you want to accept multiple connections):

//Now we need to wait for a client to connect to us.
//Accept() blocks until it receives a new connection.
try {
    //A new client has connected.
    Socket client_socket = server_socket.accept();
    System.out.println("Accepted!");
    //Hand off the socket for further handling.
    //Do something here with the socket.
} 
catch (IOException e) {
    System.err.println("Failed to accept incoming connection:" + e.getMessage());
    e.printStackTrace();
    System.exit(-1);
}

From here, handle the socket as needed.

Remember to import the following classes:

import java.io.IOException;
import java.net.ServerSocket;
import java.net.Socket;

Creating A Static IP Address In Google Compute Engine

First, go to the Google Cloud console at https://cloud.google.com/console . You’ll see the following screen. Click on a project or create a new one:

Click on the Compute Engine link on the next screen:

Press the Networks link on the left hand side navigation bar:

You’ll see the button New static IP within the Networks screen:

Name your new IP address, set a description (optional), and set the region where your IP address is located in. You can optionally also attach your new IP to a machine, if you have one running.

After you click the Create button, Compute Engine will need a few seconds to allocate a new IP address:

Once the allocation is complete, your new IP address will be listed in the Networks screen:

Generating A JAR Application For Compute Engine

Packaging Java applications for Compute Engine is slightly different than for App Engine. The code, plus any associated libraries and resources, needs to be built into a single JAR file. Here’s how to do that in Eclipse.

First, go to File – Export:

Select Java – Runnable JAR file from the options presented:

This screen sets up the JAR options. The Launch Configuration option sets the class file to run when the JAR is executed (in other words, the file containing the main(String[] args) function to start the application). Export Destination sets the directory to store the finished JAR file in.

Press Finish when you’re done. You can now use gcutil to upload the JAR file to your Compute Engine machine and run it using the standard java command (remember to install a JRE first).

Useful Commands In Google Compute Engine

I’m currently building a Java application on top of a Compute Engine machine. Here’s a few commands I find useful:

Authorizing Access To A Project & Setting A Default Project:

gcutil auth –project=projectname

gcutil getproject –project=projectname –cache_flag_values

Open Up Firewall Port:

gcutil addfirewall name-of-firewall –description=“description of firewall” –allowed=“tcp:portname

For instance, the following firewall rule opens up port 25 and names the firewall smtp:

gcutil addfirewall smtp –description=“Allow Incoming Mail” –allowed=“tcp:25”

Upload To A Server: gcutil –project=projectname push servername local-path remote-path

SSH To A Server: gcutil –project=projectname ssh servername

Installing Java: sudo aptitude install openjdk-7-jre-headless

Running A Java JAR: sudo java -jar application-file.jar